
Getting to the Galapagos Islands is part paperwork, part patience, and part adventure—here’s how to do it smoothly.
If you’re wondering how to get to the Galapagos Islands, I’m here to walk you through the entire process and help you avoid some of the surprises that popped up for us, like an unexpected form and even two aborted landings. I’ve also got a few shortcuts that can save you time and headaches.
Bill and I have traveled all over the world, and the Galapagos entry process still caught me off guard. Between the transit control card (TCT), multiple checkpoints, biosecurity screening, fees, and long lines, it’s not as simple as just checking in and heading to your gate. As my friend Della always says, “pack your patience”!
In this guide, I’ll walk you step-by-step through exactly how to get to the Galapagos Islands, from the moment you arrive at the airport in Ecuador to when you finally arrive on the islands. That’s where the fun really begins, so let’s get you to the Galapagos Islands smoothly.
Quick Overview: What It Actually Takes to Get to the Galapagos Islands
Before I walk you through each step in detail, here’s the short version of how to get to the Galapagos Islands:
- There are no direct flights from the US to the Galapagos Islands, so you’ll first fly to mainland Ecuador (Quito or Guayaquil) and connect from there.
- Apply for your Galapagos Transit Control Card (TCT) online
- Complete the Biosecurity Declaration form online
- Go through multiple screenings and document checkpoints at the airport
- Pay the Galapagos National Park fee on arrival
- Take the bus → ferry → taxi to Puerto Ayora on Santa Cruz. If you fly into San Cristobal, just grab a taxi or walk into town
The Galapagos Islands entry requirements include the Transit Control Card (TCT), a Biosecurity Declaration, multiple airport checks, and the National Park fee on arrival.
It’s all very doable, but there are more steps than most travelers expect. Knowing the order ahead of time makes the whole process feel much smoother.
Step 1: Fly to Quito or Guayaquil on mainland ecuador
If you can, try to arrive in Quito (UIO) or Guayaquil (GYE) the day before your Galapagos flight. There are several direct flights to Quito from cities like Miami, Atlanta, Houston, and New York.
We flew to Quito from Miami and arrived the day before. But if I did it again, I would stay much closer to the airport. We stayed in downtown Quito, and the drive was about 45 minutes each way. After a late arrival the night before and an early airport run the next morning, I wish we had paid more for the convenience.
My advice is simple:
- Fly in the day before your Galapagos flight
- Stay near the airport if your budget allows
- Keep your passport, flight details, and confirmations easy to grab
- Complete the paperwork in advance on a computer before leaving home
That last point matters. The Galapagos process is much easier when you handle the required forms ahead of time instead of trying to figure them out on your phone at the airport.
Step 2: Apply for Your Galapagos Transit Control Card (TCT)
You cannot board your flight to the Galapagos Islands without a Transit Control Card (TCT), so this is one step you do not want to leave until the airport.
Yes, you can complete it at the airport, but I strongly recommend doing it at home before you leave. I did ours about a week before we flew, and I’m very glad I did. The form is much easier to complete on a computer or laptop than on a phone, especially because it starts in Spanish and some of the drop-down menus are long and frustrating.
Official TCT website: https://siig-registro.gobiernogalapagos.gob.ec/app/tct/emitir/
When you first open the site, you’ll see a short video at the top. It’s in Spanish, but English subtitles run across the bottom. You can watch it if you want a quick overview.

I used Chrome on my laptop and clicked the translate icon in the top right corner of the browser to change the page from Spanish to English.

If you use a different browser, the steps may be a little different. But one way or another, I highly recommend switching the page to English before you start. It will save you a lot of guesswork.
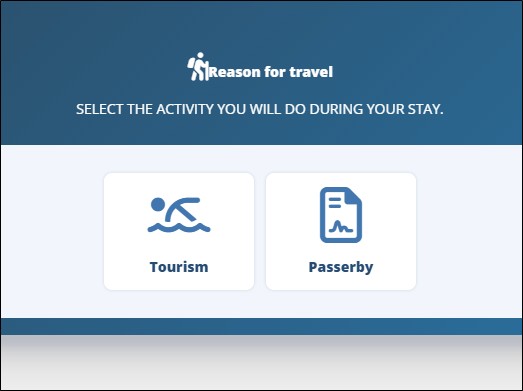
Once the page is translated, choose Tourism as your reason for travel.
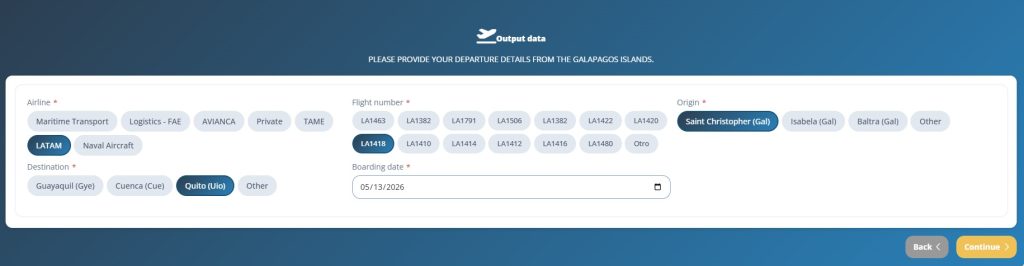
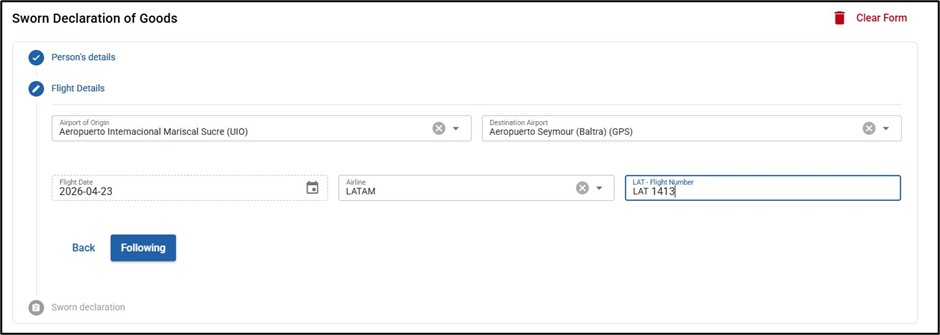
Next, enter your arrival flight details for the Galapagos.

Most people fly into Baltra, which is the airport used for Santa Cruz. Some people fly into San Cristobal instead. We flew from Quito to Baltra at the start of our trip, then flew from San Cristobal back to Quito at the end of our 30-day stay. In our case, booking two one-way flights cost about the same as a roundtrip, and it worked out really well.
Avianca and LATAM are the main airlines serving the Galapagos Islands. We flew LATAM, but I’ve also heard good things about Avianca. One very common route is Quito to Guayaquil to Baltra, with a short stop in Guayaquil where you do not get off the plane.
Then enter your departure flight details from the Galapagos Islands back to mainland Ecuador.
After that, you’ll move on to the passenger section.

If you’re working on a laptop like I was, choose manual entry for your passport instead of using the camera option.
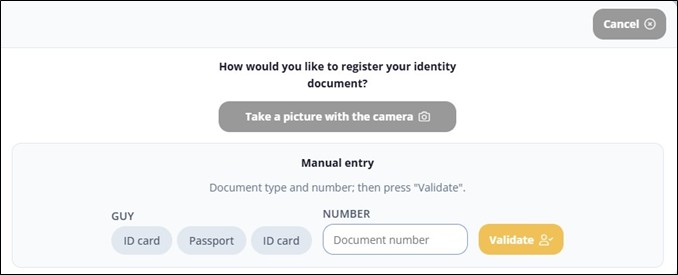
Select Passport, type in your passport number, and click Validate.
Now you’ll get to the main passenger information form, and this is where it can feel a little confusing.
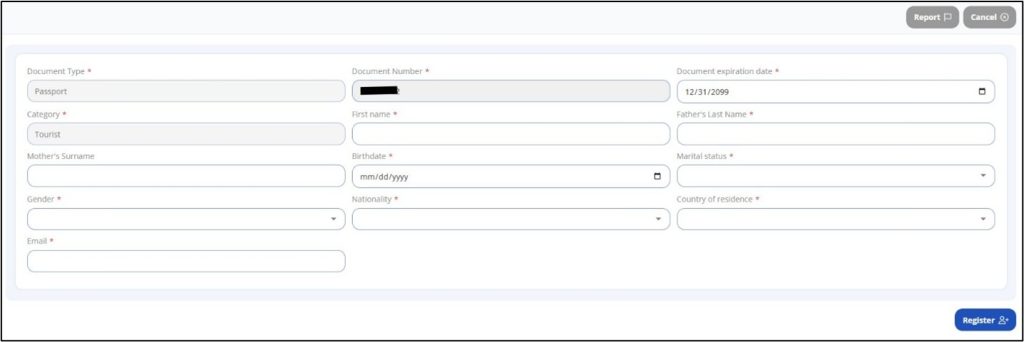
Here are the details I want you to pay close attention to:
- Document expiration date means your passport expiration date
- In the First name field, enter both your first AND middle names
- In the Father’s Last Name field, enter your own last name, not your father’s
- Leave Mother’s Surname field blank
- Use the calendar icon to enter your birthdate
- For Nationality, USA is way down near the bottom of the list, after the Z countries
- Country of Residence is also not in proper alphabetical order, so scroll slowly
Those country lists are annoying because the countries are not in alphabetical order. It may take longer than you expect to find USA, and when I clicked it, I had to be careful because it did not select cleanly the first time.
Once you’ve entered everything, click Register.
Then you’ll see a summary screen showing the passenger information you entered.
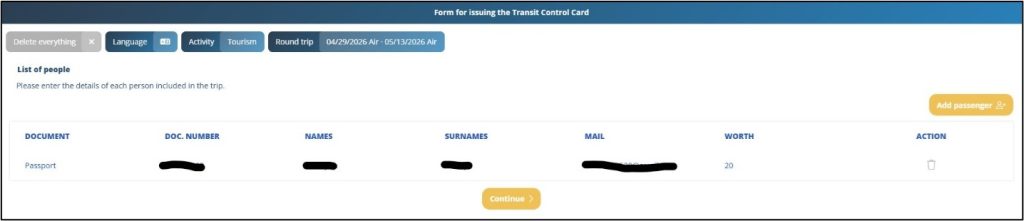
Double-check it carefully before moving on.
Next comes accommodations.

Click Add, and then choose the correct accommodation type.
If you’re staying in a hotel, use the first Hotel tab and search for the property name. Be patient here too. The hotel list is not in alphabetical order, so it can take a while to find your property.
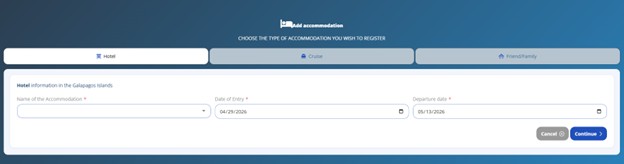
If you’re taking a liveaboard cruise, use the middle Cruise tab and enter the boat name and dates.

If you’re staying in an Airbnb or private rental, use the right Friend/Family tab.

For this option, you must enter your host’s 10-digit Resident ID number.
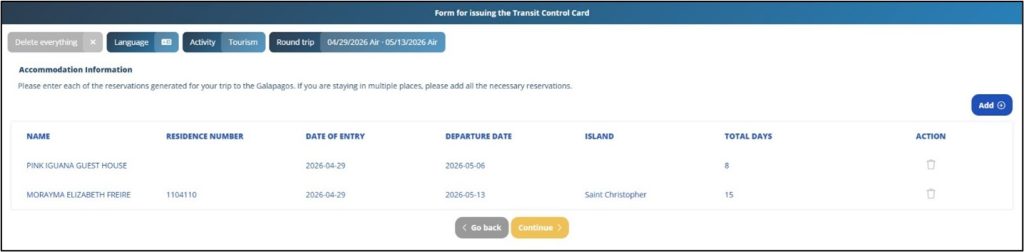
This is important: it has to be the 10-digit ID number, not the shorter 7-digit one. Bill and I stayed in three different places, so I had to contact all three hosts ahead of time to get those numbers. Do yourself a favor and gather those before you start the form.
Once all your accommodations are entered, click Continue.
Next, you’ll need to accept the terms by clicking the yellow button.
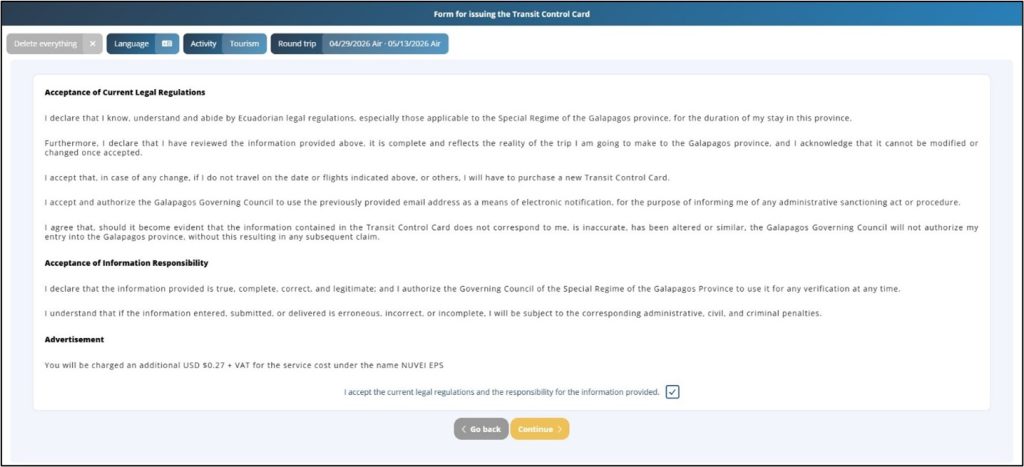
Then you’ll choose your payment method. Your TCT is not processed until payment is made. Your choices are Pay at Airport on the left, Pay by card on the right.

I strongly recommend paying online. It’s one less thing to deal with on travel day, and it helps you move through the airport lines faster.
If you pay by credit card, the payment screen will still be in Spanish.
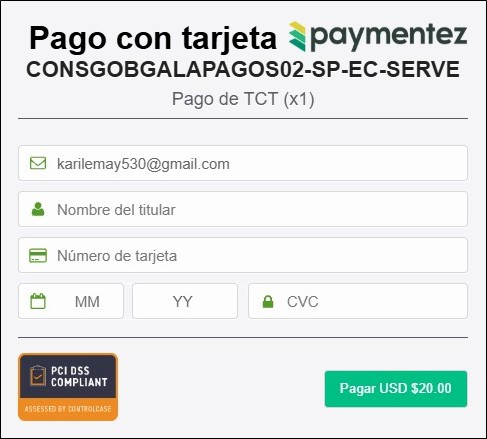
Here’s what the fields mean:
- Nombre del titular = Name on the credit card
- Número de tarjeta = Card number
- MM / YY = Expiration date
- CVC = 3-digit code on the back
Then click Pagar USD $20.00.
If you choose to pay at the airport instead, you’ll get a screen with a QR code and registration confirmation number.

If you go that route, save the QR code as a photo on your phone. On travel day, you’ll need to show that code and provide the registration confirmation number at the Galapagos Government Council counter. Just remember: your TCT is not actually issued until payment is completed.
We paid online by credit card, received our TCT forms as PDFs by email, and printed out paper copies to bring with us.
My best advice for this whole TCT step:
- Do it at home on a computer
- Translate the page to English before you start
- Have your flights and accommodation details ready
- Ask Airbnb hosts for their 10-digit ID numbers in advance
- Be patient with the drop-down lists
- Pay online and keep both digital and paper copies of your TCT
That one bit of prep will make your Galapagos travel day much smoother.
Step 3: The Galapagos Islands Airport Process In Quito
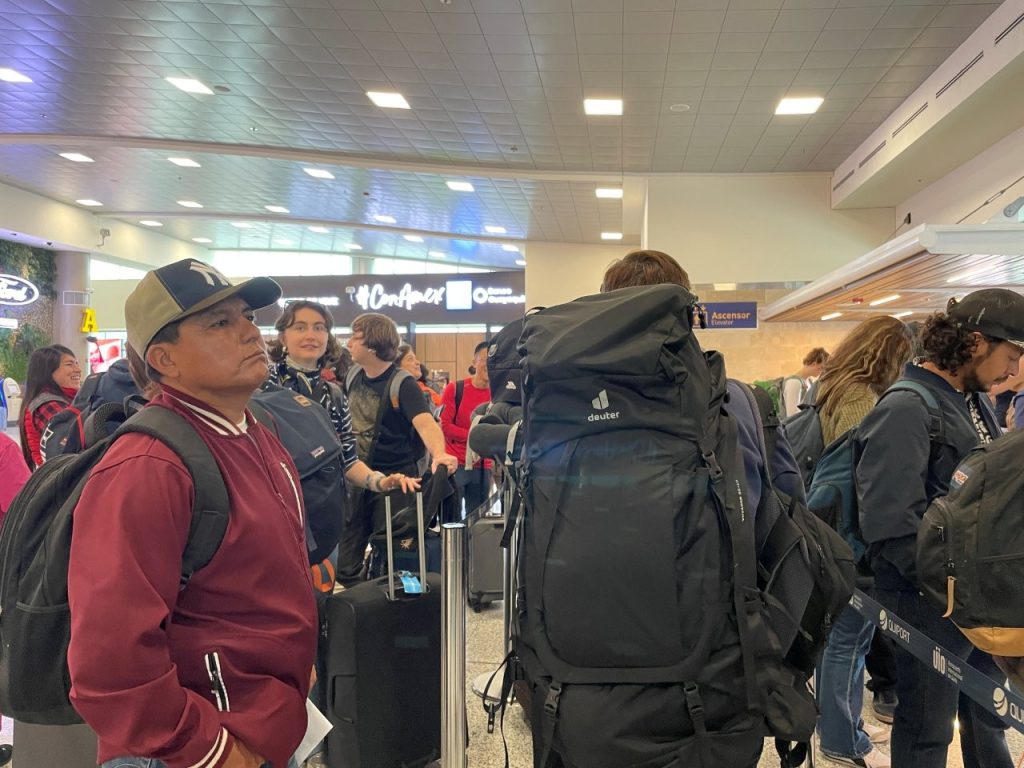
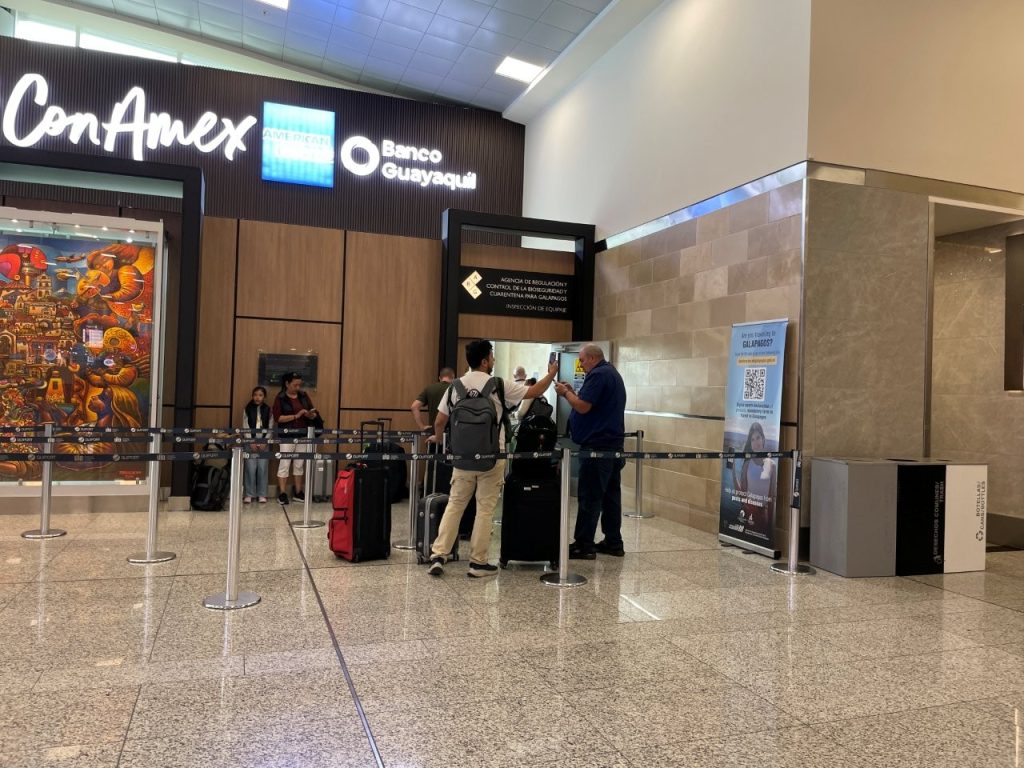
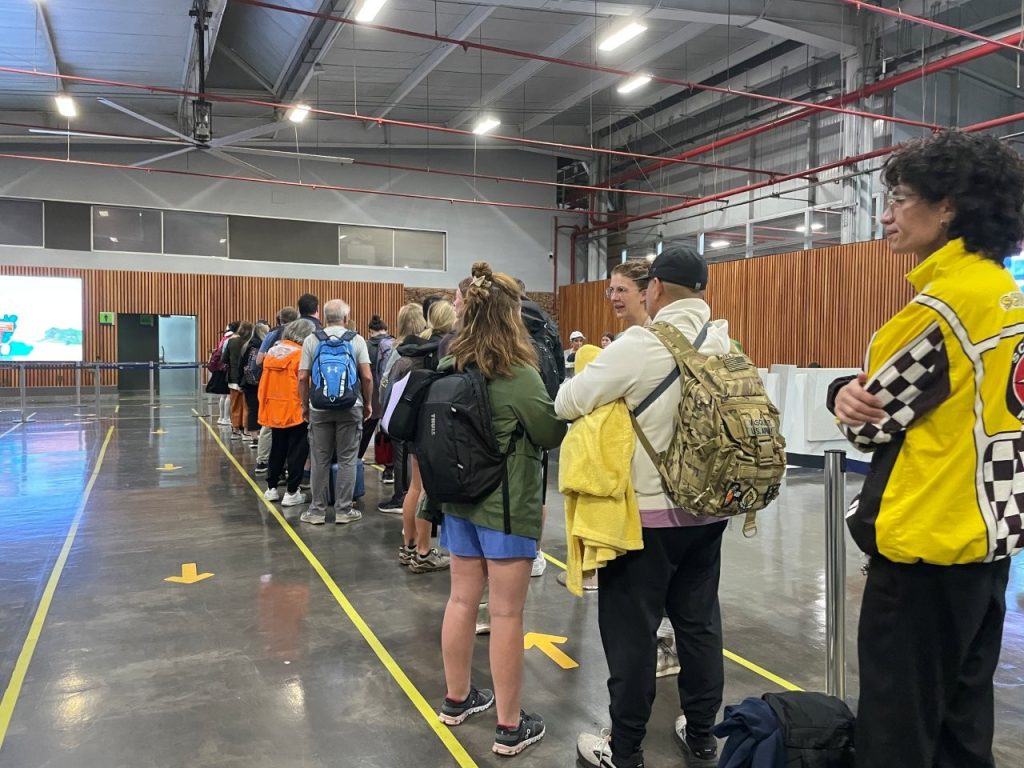
Once you arrive at the airport, there are still a lot of steps to complete before you can board the plane to the Galapagos Islands. We recommend arriving 3 hours early, even though it’s a domestic flight. The Galapagos Islands airport process is where things can start to feel confusing fast.
A) Complete or verify your TCT card
At the airport, the TCT desk is immediately to the left when you enter through the Departure door. There are two lines, although they can be a little hard to distinguish if there are a lot of people there.
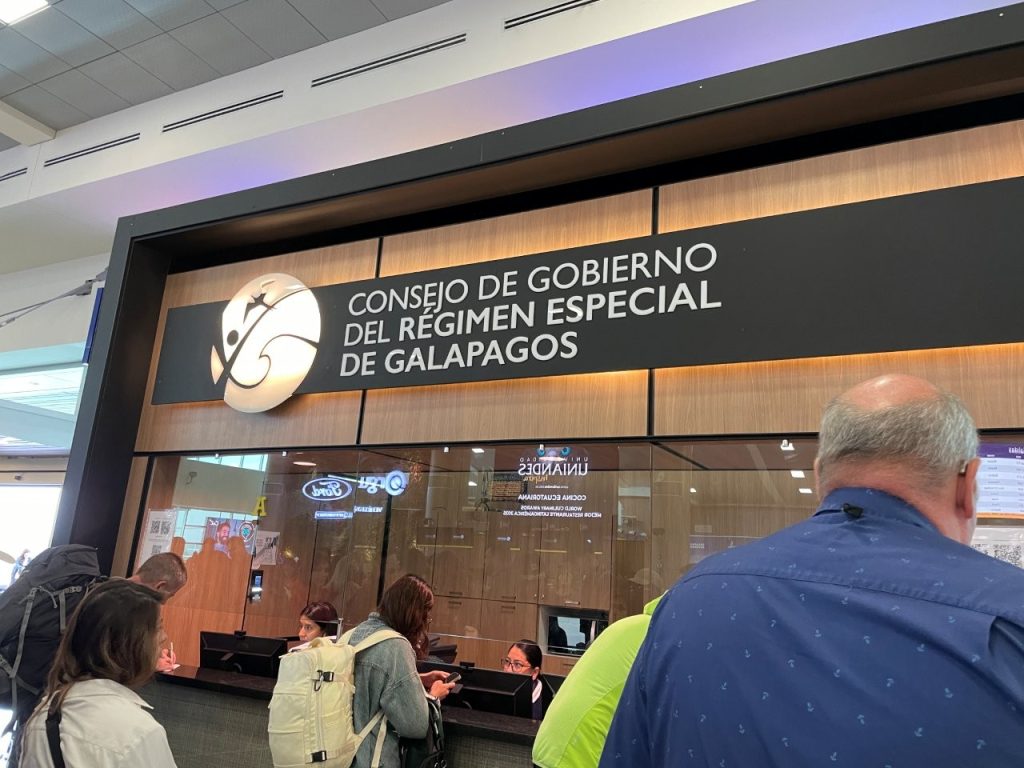
If you already completed your TCT online, you still have to get it verified at the airport. But there’s a “fast lane” on the right-hand side of the TCT desk for people who completed and paid online. You’ll need your TCT form and your passport.
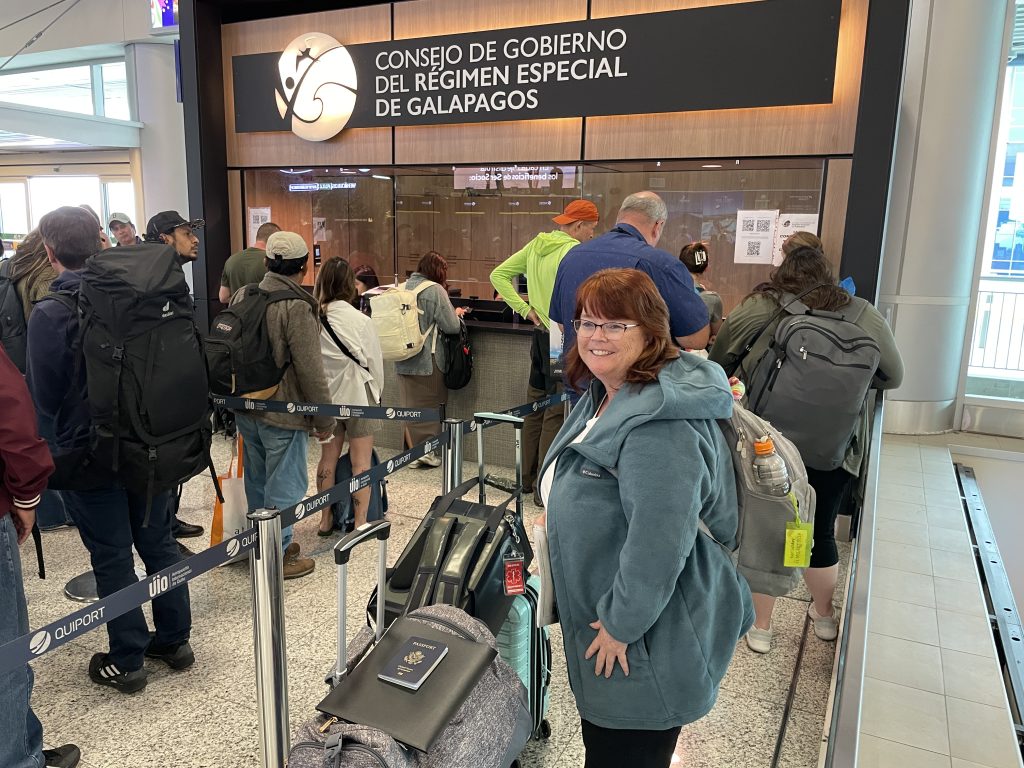
If you haven’t completed the form online, or you chose not to pay in advance, you’ll need to wait in the longer line on the left. I’ve heard people say that line sometimes moves quickly and other times takes hours, so you really want to arrive at the airport with plenty of time.
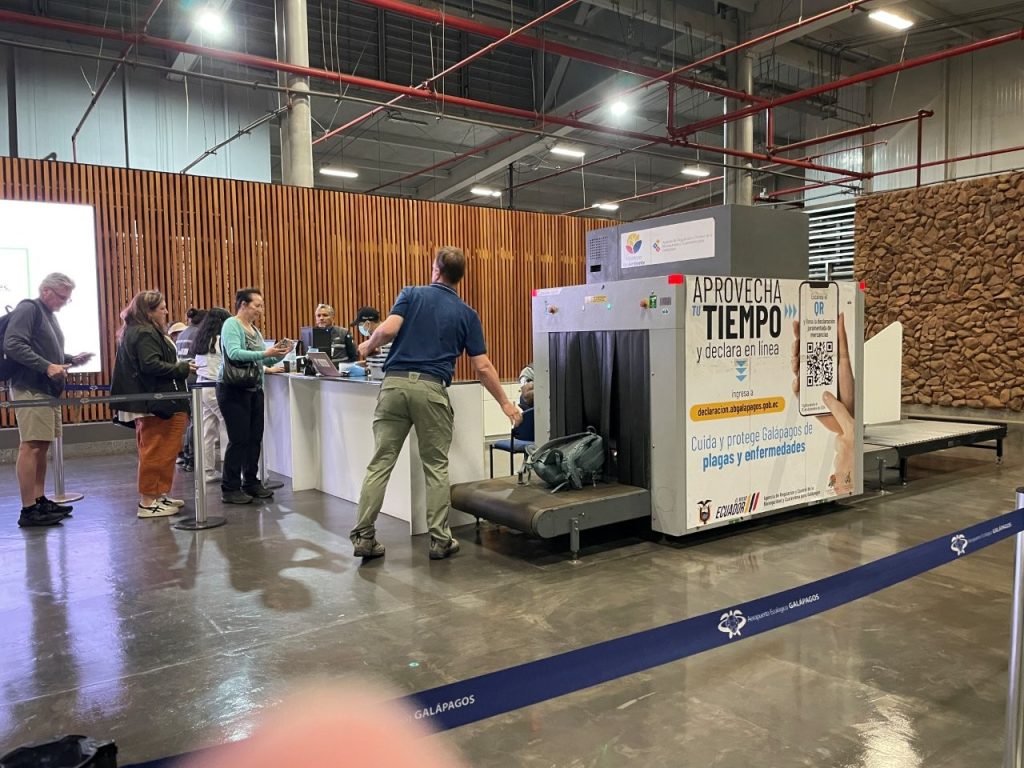
B) Biosecurity declaration, luggage inspection, and one more surprise form
After the TCT line, you head to luggage control with all of your bags. This area is to the right of the airport entrance. Because the Galapagos Islands are a UNESCO World Heritage Site, the biosecurity process is strict for a reason.
But before you get into that line, you need to complete a Declaration of Goods form saying you are not bringing prohibited items into the Galapagos Islands.
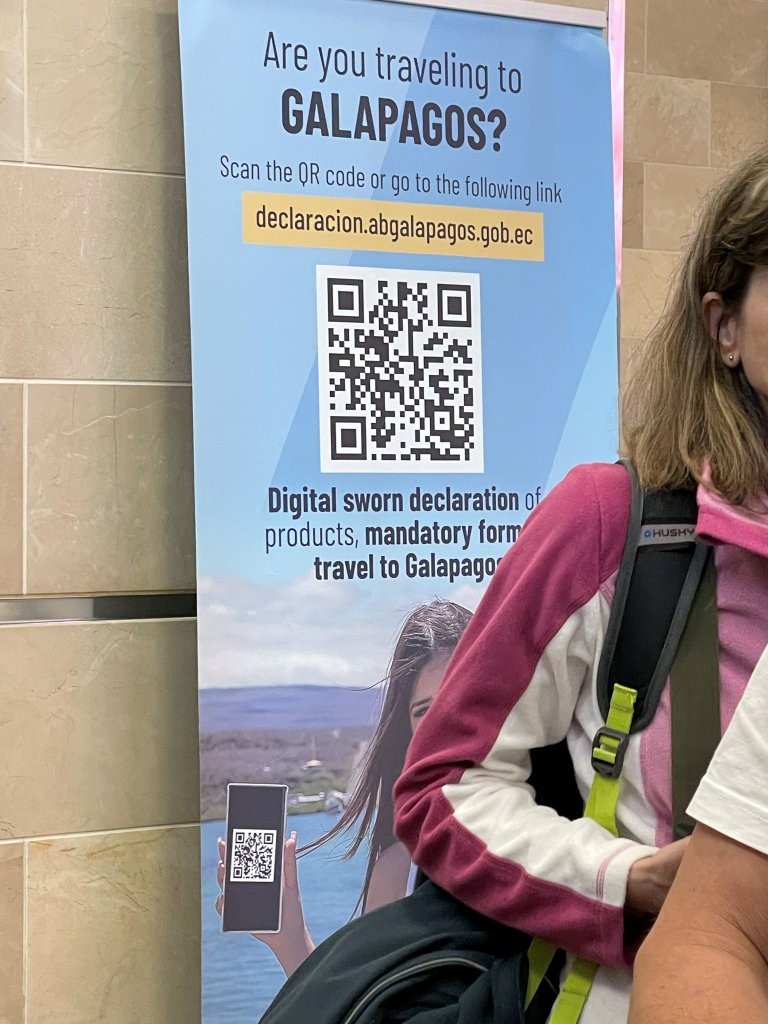
This step completely caught us off guard. We thought we had everything done and we hadn’t read about this step anywhere. Suddenly there was a huge QR code on the wall, no paper forms anywhere, and one more mandatory form we had to fill out online before we could even get in line.
My eSIM was not cooperating, and I was having trouble getting onto the airport Wi-Fi. Once I finally shot the QR code, the form was totally in Spanish and I was uncertain what to enter into each field. It was not a fun moment for someone like me who prides herself on being fully prepared.
What items are restricted from going to the Galapagos Islands?
The Galapagos Islands are a fragile and highly protected environment, so they are very strict about what you can bring in. In general, you should assume that any food, plant materials, animal materials, soil, and similar natural items are prohibited or restricted. Single-use plastics are also prohibited. There is a full and official list available online, but it is in Spanish. https://bioseguridadgalapagos.gob.ec/lista-de-productos/
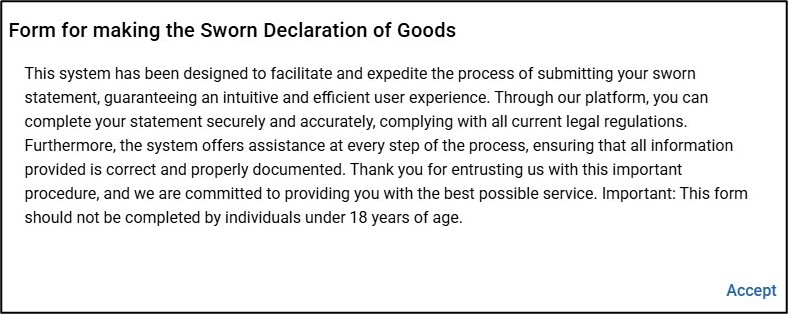
Complete the Declaration Before You Go
My strong recommendation is to do this declaration form online in advance on a computer. It can only be completed within 5 days of your flight, but if you do it at home on a computer, you can translate it to English and it is soooo much easier to complete.
Official declaration form: https://siabg.abgalapagos.gob.ec/declaraciones/nueva
I’ll walk you through it as there a few spots which might make you stumble.
The first screen is just an acceptance page.
The next screen asks for your personal information, and you’ll need to complete it separately for each person in your travel party.
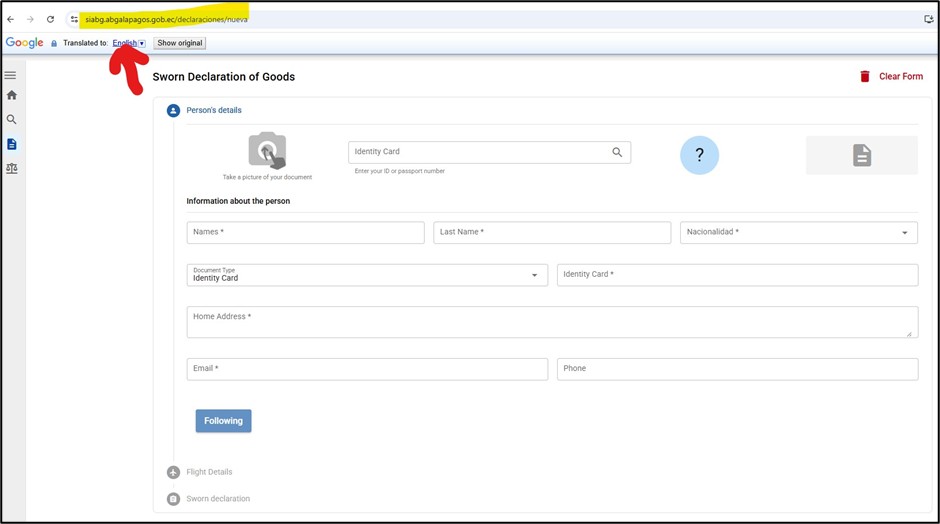
A few things here can trip you up:
- When they say “document,” they mean your passport. Throughout South America, they often refer to your passport as the Document with no other description.
- You can take a photo of your passport, or just enter your passport number manually
- In the Names field, enter both your first and middle names
- In the nationality field, USA is not listed as US, USA, or United States. It shows up as Estado Unidos or a similar variation, so you need to look in the E section
- If you do this in English ahead of time, it is much easier to understand what they are asking
The next screen asks for your flight details. Very straight forward.
Then comes the most important part: declaring that you are not bringing prohibited goods.
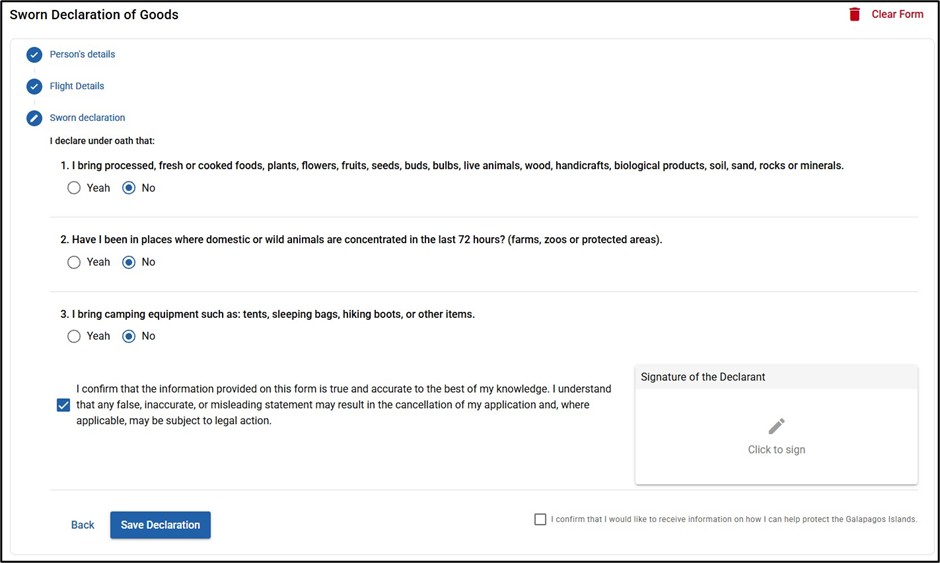
There are three main things they ask about.
- Whether you are bringing in food, plants, flowers, fruits, seeds, animal products, soil, sand, rocks, or similar items. You want to be able to answer NO.
- Whether you have been around domestic or wild animals in the last 72 hours, such as on farms, in zoos, or in protected areas. Again, you want to be able to answer NO.
- Whether you are bringing camping gear such as tents, sleeping bags, hiking boots, or similar items. Again, NO.
I wondered whether my granola bars might count as seeds, but because they were unopened and commercially packaged, they were fine.
After that, sign the form with your fingertip or mouse and click Save Declaration.
Once you submit it, you’ll get a QR code.
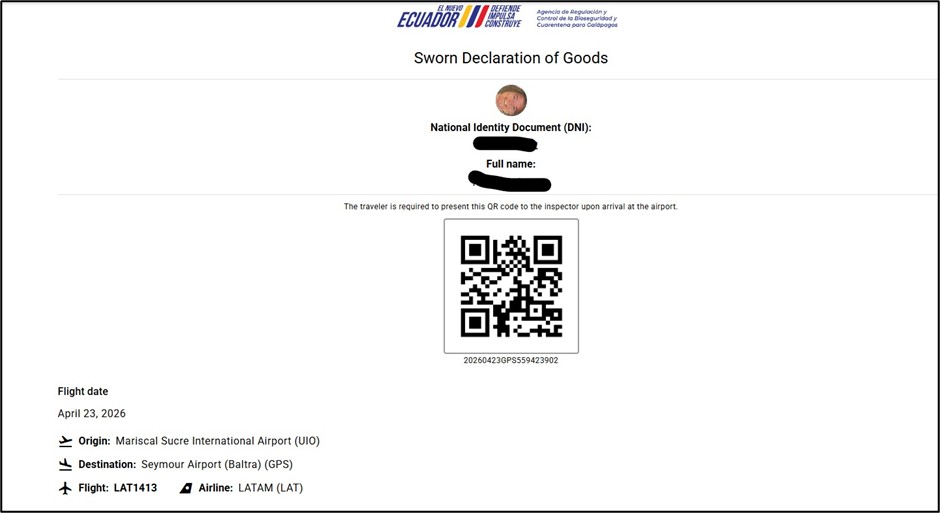
Take a screenshot of that QR code or save it as a photo on your phone. You’ll need to show it to the luggage inspector, and it goes much faster if you can pull it up immediately.
C) Several more checkpoints and screenings
After that, you still have several more checkpoints. You’ll show your passport and forms again, and your luggage will get scanned again, similar to TSA.
Then you’ll get to the gate and think you are finally done showing paperwork. Nope. They wanted to see our TCT form again when we were boarding the shuttle to the plane. I had already packed ours away and had to dig them back out while standing at the turnstile.
It was stressful, and it’s exactly why I recommend keeping your passport, TCT, and declaration QR code somewhere easy to reach until you are actually seated on the airplane.
Step 4: Your Flight to the Galapagos Islands (And What Can Go Wrong)
Finally, you’re seated on the plane and ready to get this vacation in the Galapagos Islands started! Let’s Go!!
Our experience, however, still had a few more hiccups to deliver.
We took off from Quito, landed in Guayaquil, sat there for almost an hour, (was supposed to be 39 minutes), and then took off for Baltra Island in the Galapagos.
When we arrived two hours later, the pilot started to land the plane, then suddenly pulled up just before touching down. He circled around in a big sweep and came in for a second try. Nope. Aborted again. Too windy to land safely, he said.
So we flew all the way back to Guayaquil to refuel. Two more hours back over the ocean.
At that point, we still had no idea what the plan was. Were we going to try again? Stay overnight in Guayaquil? Return to the Galapagos the next morning?
For Bill and me, it didn’t really matter because we didn’t have anything scheduled for the next day. But a lot of the people around us were clearly stressed because they were worried about losing one of their precious days in the Galapagos Islands.
Once we landed in Guayaquil, everyone gathered their personal and carry-on items and started preparing to deplane. Still, no real information was being given.
Then, just as the doors were about to open, they announced that the airport on Baltra had agreed to stay open later than normal so we could return and attempt another landing. A lot of people were happy to hear that, but it also meant two more hours sitting in the same seat on the airplane. A new crew of pilots and cabin staff came on board.
Then the flight crew asked “Is there a doctor on board?” There was a medical emergency in First Class that ate up another hour. A Navy veteran’s oxygen tank stopped working, so he and his wife had to be helped off the plane to go to the hospital.
We also heard that a different airline had landed successfully at Baltra just after our second aborted landing, which made the whole thing feel even stranger. Maybe it was a smaller plane, maybe a bigger one. I have no idea.
Finally, we were on our way to Baltra again. Another two hours on the plane. The sun was starting to get lower in the sky, and I remember wondering whether we were actually going to make it this time.
We did. We landed smoothly, and everyone on the plane cheered and clapped. By then, we had been dealing with that flight for about eight hours.
I’m not telling you this because I think your flight will go like ours. Most won’t. But it is a good reminder not to plan anything critical for your first evening in the Galapagos Islands. Leave yourself some flexibility and pack your patience!
Step 5: Arrival at Baltra Airport (Still More Steps Than You Expect)
When you finally arrive on Baltra, you still are not done.
You’ll deplane and make your way inside the airport to get your passport stamped and pay the $200 Galapagos Islands National Park fee (in cash). Somehow, we ended up at the very end of that long line.
Then you’ll go through another declaration and luggage screening. I don’t know how they thought we could have added anything to our luggage when we were sitting on the plane for eight hours.
Interestingly, when we arrived, they did not ask to see our TCT again, even though we had been asked for it multiple times before boarding.
Step 6: Getting from Baltra to Santa Cruz (The Final Stretch)
Once you’re through that process, you head outside to the bus area and pay $5 per person for the shuttle to the ferry crossing. The bus leaves only when it’s full, so if you are one of the first people on, you may sit there for a while. Luggage goes under the bus. The ride takes about 20 minutes.

At the ferry crossing, your luggage is loaded on top of the boat. You pay $1 per person for the short ferry ride from Baltra to Santa Cruz. It only takes about 10 minutes.
From there, you can either take a taxi to Puerto Ayora for about $30 or a bus for about $5. We took a taxi and it took almost an hour.
Our driver didn’t speak any English. Bill kept asking him questions about the area in English, and the driver kept saying “Si,” but I don’t think he really understood what Bill was asking. We used Google Translate to ask whether he could take us to the grocery store before dropping us at our lodging, and he said “NO” rather emphatically.
By the time we finally reached our accommodation, it was around 8:00 at night, 14 hours after we left for the Quito Airport that morning. The day had been full of lines, forms, screenings, buses, boats, and planes and we were exhausted.
But we were finally in the Galapagos Islands, ready for our 30 day adventure. Now the fun could finally begin!!
GALAPAGOS ISLANDS FEES AND PERMITS: TOTAL COST BREAKDOWN
One thing that surprised me about how to get to the Galapagos Islands is how many little transportation and entry fees pop up along the way.
None of them are outrageous individually, but it helps to know about them ahead of time so nothing catches you off guard and you have enough cash on you.
These are the main Galapagos Islands fees and permits you’ll want to budget for before your trip.
| Expense | Cost (per person) |
| Galapagos Transit Control Card (TCT) | $20 |
| Galapagos National Park Entry Fee | $200 |
| Shuttle Bus from Baltra Airport to Ferry | $5 |
| Ferry from Baltra to Santa Cruz | $1 |
| Taxi to Puerto Ayora (shared or per cab) | About $30 |
Estimated total before flights to the islands: about $226 per person, plus ground transport if you take a taxi.
A few notes:
- The TCT fee can be paid online or at the airport.
- The National Park fee is paid on arrival in the Galapagos Islands.
- The taxi from the ferry to Puerto Ayora can be split if you’re traveling with others.
- If you take the public bus instead of a taxi from the ferry, you can save quite a bit.
None of these fees bothered me because I knew about them in advance. But if I didn’t, it would have been an unexpected surprise. Hopefully now you won’t have that.
If this is your first visit, my First Time Galapagos Travel Guide covers the practical things I wish I understood before we arrived.
Biggest Tips to Avoid Stress When Getting to the Galapagos Islands
If I were helping a friend prepare for this trip, these are the things I’d tell them to do differently than we did.
1. Complete the TCT form in advance
Handling these Galapagos Islands travel requirements before you leave home will make your airport day go so much smoother.
2. Complete the Biosecurity Declaration in advance
This was the biggest surprise for us. We thought we had all our paperwork done, then found out at the airport that there was another mandatory declaration form we needed to complete before getting in the luggage inspection line.
My eSIM was not cooperating, I was struggling with the airport Wi-Fi, and it was a stressful way to start the morning.
You can only complete this form within 5 days of your flight, but I highly recommend doing it ahead of time on a computer so you can translate it into English and deal with it calmly.
3. Keep your documents handy until you are actually sitting on the plane
Do not assume you are done showing paperwork just because you already showed it once.
I made the mistake of putting our TCT away too early, and then had to dig it back out while boarding the shuttle to the airplane. Keep your passport, TCT, boarding pass, and declaration QR code somewhere easy to grab until you are physically seated.
4. Screenshot everything
Do not rely on airport Wi-Fi or your phone connection working perfectly when you need it.
Before leaving for the airport, screenshot:
- your Biosecurity Declaration QR code
- your flight confirmations
- your accommodation confirmations
Having all of that saved as photos makes this process so much smoother.
5. Arrive early and expect more steps than you think
This is not a quick, simple airport morning.
There are lines, forms, luggage inspections, document checks, and repeated checkpoints. If you go in expecting a long process, it feels much less frustrating than if you assume it will be quick.
And as my friend Della always says, Pack your Patience!
6. Build flexibility into your travel day
Most flights to the Galapagos go smoothly. Ours did not.
Between delays, two aborted landings, and the extra bus-ferry-taxi sequence after arrival, this ended up being a much longer travel day than we expected.
I would not plan anything time-sensitive for your first day in the islands. If everything goes smoothly, great. If not, you’ll be glad you gave yourself some breathing room.
Frequently Asked Questions about how to get to the galapagos Islands
How do you get to the Galapagos Islands from the US?
If you’re wondering how to fly to the Galapagos Islands, the first step is booking a flight from the US to mainland Ecuador, usually Quito or Guayaquil..
From there, you take a domestic flight to the Galapagos, complete the required entry steps, then continue by bus, ferry, and often taxi to reach places like Puerto Ayora.
It’s a process, but once you understand the steps, it’s very manageable.
Do you need the Galapagos Transit Control Card?
Yes.
The Galapagos Transit Control Card (TCT) is required for every visitor entering the islands.
You can apply online before your trip, which I highly recommend, or complete it at the airport. Doing it ahead of time can save you a lot of stress.
How long does it take to get to the Galapagos Islands?
From the US, getting to the Galapagos usually takes at least a full travel day, or two if you follow our advice about getting to mainland Ecuador the day before.
For us, with flights, airport procedures, transfers, and then getting from Baltra to Puerto Ayora, it was basically dawn to evening.
And that was with an eight-hour flight saga thrown in.
Most trips will be smoother than ours.
What fees do you pay to enter the Galapagos?
Most travelers should expect:
- $20 Transit Control Card
- $200 National Park fee
- $5 airport shuttle bus
- $1 ferry
- $30 Ground transport costs on Santa Cruz
Those are the main fees you’ll want to budget for.
Is Getting to the Galapagos Islands Worth It?
Yes, getting to the Galapagos Islands is a little complicated.
There are forms.
There are fees.
There are more checkpoints than you expect.
And yes… it can feel a little overwhelming the first time. But once you understand the process, it is completely manageable.
If you came here wondering how to get to the Galapagos Islands, I hope this makes the process feel much smoother and a lot less intimidating. I’ve done the research, made the mistakes, and now you can skip the confusing surprises.
And if you’re asking me—Is getting to the Galapagos Islands worth it?
Absolutely.
More Galapagos Travel Guides
Here are some more posts about visiting the Galapagos Islands. If you’d like to receive emails when I’ve posted new content to the site, please complete the short form above.
Overall Galapagos Planning Guides
- First Time Galapagos Travel Guide: What I Wish I Knew Before Going
- Galapagos Itinerary: How Many Days Do You Really Need?
- How to Choose the Best Galapagos Snorkeling Tour for YOU
- Best Time to Visit Galapagos: What to Know Before You Go
- Galapagos Trip Cost: What We Spent For 30 Days (It’s Less Than You’d Think)
- What to Pack for the Galapagos – The Island-Hopping Packing List
- How to Get to the Galapagos Islands: What No One Tells You
- Galapagos Ferry Guide: What We Wish We Had Known
- Galapagos Liveaboard vs Land-Based Trip – Which Is Right for You
Santa Cruz Island Galapagos Guides
- Best Things To Do In Santa Cruz Galapagos + Tours Worth Booking
- Where To Stay In Santa Cruz Galapagos: 9 Hotels For Every Budget
- All The Best Low-Cost And Free Things To Do On Santa Cruz Island
- Bartolomé Island Tour Review: Bucket List Must-Do or Overrated?
Isabela Island Galapagos Guides
- Best Things To Do In Isabela Galapagos: Snorkeling, Beaches & Volcanoes
- Where to Stay in Isabela Galapagos: Best Hotels for Every Budget
- Best Low-Cost and Free Things to Do on Isabela Island Galapagos
- Los Túneles Tour Review: Did It Live Up To The Hype?
- Las Tintoreras Tour Review: Is It the Right Snorkeling Tour for You?
- Concha De Perla: Free DIY Snorkeling On Isabela Island Galapagos
San Cristobal Island Galapagos Guides
- Best Things to Do in San Cristobal Galapagos: Tours, Beaches & Wildlife
- Where To Stay in San Cristobal Galapagos: Best Hotels For Every Budget
- Budget Friendly And Free Things To Do On San Cristobal Island
- Kicker Rock Snorkeling Tour Review: Did It Live Up to the Hype?
- Española Island Tour Review: Rare Birds and Epic Snorkeling
- Punta Pitt Tour Review: The Remote Galapagos Tour Most Visitors Overlook